Tuesday, November 5, 2013

I'm Still Alive......

I know it seems like I've disappeared never to return, things have not only been crazy but my life is a little upside down right now.  Lets rewind a little; Tyler and I were finishing our shop and rebuilt our dogs kennel, I was still sneaking in a little furniture painting here and there.  We then decided that we wouldn't stop the renovations there, nope were where going to finish the front of the house as well.  This meant new windows were the Hardi Board was being installed, borrowing my father in laws bobcat to pull our front yard back and extend our parking........ This is were the snowball effect turned into an avalanche. 
To keep this long story somewhat short we ended up buying all new windows for the entire front of the house and the main floor of the back of the house, a new front door, a new custom window for over said new door, a brick retaining wall in front of the new parking, reforming and pouring an addition to our front steps, taking out the garage door (that wasn't actually usable as the garage was converted into the living room of our basement suite) building a wall in its place with a window, levelling the driveway so it no longer sloped down to the old garage door, and bringing in new rock for the entire driveway, taking out the grass on the side of the house and having rock there instead, moving our air conditioner from the front of the house to the side........


This doesn't even get into the removing of the old siding, brick, garage door and windows, framing in were the brick had been and for the new door so around the two lower windows and door were all a level surface for the ledge stone we've been dreaming about for years.  Living without a front door for weeks with nothing but plywood nailed over the opening.


Here is were the story goes from renovating to what I now call "EXTREME RENOVATING."  Through all this I was still working my full-time evenings 1430-2230 and upon one of those fateful nights when I arrived home from work at just after 2300.  Walking around to the back of the house since the front door was out of commission I was greeted by this site.


The first thought through my mind was, "were could that drywall and studs possibly have come from?" I look up to see my husband on the deck smiling.  Upon reaching the top of the deck stairs and looking through my french doors I realize I can see my living room TV from the deck and my two pantries, fridge and wall are missing.  I was quite speechless for the next little bit other then the words,"You took the wall out."


After overcoming my shock we started deciding how we were going to tackle this.  We already knew there was no way we could afford a brand new kitchen, we would have to work with what we had.  I've always wanted kitchen cabinets that go to the ceiling not only because of how beautiful and high end they look but so I never have to clean that grimy space above the cupboards again!  This paired with having to fix the ceiling were the wall use to be we decided to drop the ceiling in the kitchen six inches and then do a six inch crown moulding on the cabinets to the ceiling.  After much debate on starting and stopping the drop ceiling it was decided that we would extend the drop ceiling into the dining room as well.  This allowed me to get my much dreamed about pot lights in the entire kitchen and dining room and also down my hallway as well.  At this point with all the drywall repair and new drywalling we also decided it was the perfect time to replace all the baseboards, doors and jams.


Now let me paint a picture for you, I'm living in a house with no interior doors, window covers, multiple areas of wall missing drywall, no front door and work being done in every square inch of my house inside and out.  If this wasn't enough for my hair to turn grey already; tragedy struck, I was injured at work.  I won't go into details on this lets suffice to say I've now been at home for just over two months unable to do anything.


Here's were I leave you today and say thanks if you stayed with me to the end of this very long post.  The reno's are continuing and my amazing husband is not only doing this but working 10-16 hours a day, cleaning, cooking, doing laundry, and looking after me.  What more could a girl ask for?  

Sincerely,
Sasha

A few more random photos of the process........


Friday, June 7, 2013

Can I Please Keep Them........

I've been pretty good with not getting overly attached to the pieces I bring home to refinish but these side/end tables have just stolen my heart, especially since their turquoise.  You would never know by looking at my house but I have a huge love for anything and everything turquoise, unfortunately my husband doesn't quite share the same love.  Needless to say if I can find somewhere to put these beauties before they end up selling they are staying with me!


I've been desperately waiting to use my ASCP colour Provence and when these tables came up I just couldn't resist.


I did one coat and ended up finding it to much and just wasn't working for me.  So I did a custom Old White and Pure White mix and decided to do a white wash overtop.  As I was going along I ended up finding a new white washing technique that ended up doing my distressing for me and the overall look of it turned out to be perfect.


I just love the before and after, especially those gorgeous huge wood knobs!  I was going to paint them to match but quickly changed my mind after holding it up to a finished drawer.  So glad I didn't, it just ties it all in and finishes it so nicely.


These beauties are for sale on my Facebook page, stop by and see my other current listings.

https://www.facebook.com/pages/Finding-the-Chic-in-Shabby/495169327210303

Sincerely,
Sasha

Wednesday, June 5, 2013

Current Projects Keeping me Busy.........

Unfortunately of late it seems that its getting harder and harder to have time for my furniture or get anything done.  As much as I am sad that all these lovely pieces are just sitting here I haven't been idle. It's been a lot of early mornings before work and going full tilt on days off to finally start finishing up the at home to do list.  My husband and I refer to this list as our hundred thousand dollar wish list, and maybe one day we will be lucky enough to accomplish it all.  For now were more then happy to cross a few long over due items off!

Three years ago we started this shop and am so happy and proud to say we finally finished!  Its more then we ever imagined and we are so thankful.  If only it came with a paved driveway ;)


This picture doesn't quite do the colour justice its actually a beautiful grey, once we get more landscaping and things organized better I will take some pictures that show this beauty off better.

After we passed the inspection we could finally finish our dog pen, Tyler and I have been planning this dog pen for what seems like forever and for a couple amateur DIY's were both happy with the end result.  I'd like to say the dogs appreciate it as much as we do.......


We poured the cement pad at the same time we did the floor in the shop which was probably a good year and a half or more ago and set the posts.  We had a temporary structure until the final inspection of the shop and tore it down to this stage.


We've dubbed it, "the stable" and firmly believe we have moved into the crazy dog owner category.  We built it so some of the panels are removable as we have heated dog beds and water dishes so no cords showing or able to get damaged or chewed on.  I don't have pictures of the backside but there's a gutter there and we also have covered storage to hang all our yard equipment.  We still have a few things to finish up but the dogs are happily living it up in their new digs.


Sincerely,
Sasha

Saturday, May 18, 2013

The Long Awaited Sideboard.........

This sideboard has been with me for quite some time and always seemed to get pushed to the back.  That might have been since it wasn't the original sideboard I was hoping to paint so beautifully with a gorgeous stained wood top......"sigh" This sideboard definitely can be categorized as a diamond in the rough and the rough went on for many many weeks.  This piece took me three and a half weeks to finish.......  She is all diamond now though!


This piece was in very rough shape when I made my husband go pick it up for me because I just had to have it.........


I ended up removing the wood veneer top and had lots of filling to do on the big middle drawer.  Now because of the damage to the wood veneer top I thought it would be easier then trying to fill it with wood filler........when people warn you that lifting veneer is a last option please listen!  Half the top came off super easy, I soaked a towel and let it sit on the top while I worked on other things and came back every hour to lift what I could.  After day three of this process I was done and just started painting, I was losing focus and needed to keep motivated.

Two coats of ASCP Paris Grey later I was ready to distress.  I didn't thin my second coat like I normally do as I wanted this piece to be textured  and to showcase the life this piece had lived.  This is my most heavily distressed piece and it is even more beautiful for it.  Every nick and bump just added more interest to the beautiful details on this piece.  I even played with the wet distressing more to showcase the texture of the paint on the drawer fronts and the side panels.


Finally I had finished the entire piece except for the top......I was dreading it having no idea what I was going to do or how I was going to get those last few pieces of veneer off.  Lucky for me my husband can be pretty awesome and while I was at work he removed those straggling pieces for me.  I still had no idea what I was going to do but the surface was ready for me.

One of my inspirations was this top by Kristy at 4 LOVE OF WOOD, I adore this layered look!


Finally tired of trying to think of the perfect finish I opened my can of stain and just went for it.  The stain didn't take how I wanted and I got a little frustrated so I decided to paint over it and it was so warm outside my paint was setting up to fast so I brushed water on top so I had a longer working time.  Were I decided to use a rag and start doing a bit of a white wash I may never know, what I do know is a was starting like what was happening.  I then hit the top with stain again and knew I finally had my finish!  I did the same process a few more times to achieve the exact layered look I wanted to and am thrilled with the end result.  This piece is so cool and I hope you all enjoy it as much as I do!

Sincerely,
Sasha


Friday, May 17, 2013

A Throw In........


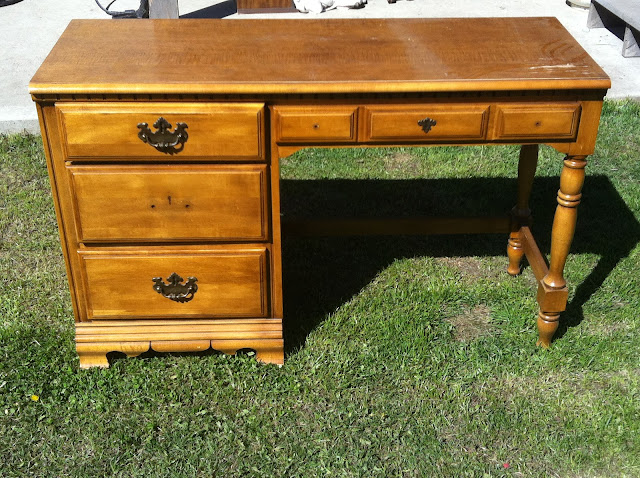
This cute little desk made by Pepplers fine furniture was actually thrown into the deal I made when buying the french provincial bedroom set.  I didn't give it much thought at first since I was caught up in the bedroom set, it snagged my attention more when I fell in love with ASCP colour Paris Grey.


As per my norm I had so many ideas I just couldn't decide at first how I wanted to finish this little gem. Since my sideboard wasn't going to end up with a beautiful stained top I decided to strip the veneer wood top and stain it.  I was a little hesitant with the stripper since you don't have much thickness to work with, and you can't leave the stripper on as long with veneer.  It ended up only taking a short time and was faster and easier then stripping a solid wood piece.  I went with a very dark stain for the top and the veneer didn't take as dark as I would have like.  It ended up working in my favour though as the original stain colour and my new stain colour created a striking duel toned top.  I applied two more coats of stain till I was happy and then did a varathane finish.


From here i just put all fears aside and jumped in with the ASCP Paris Grey and instantly fell in love with the colour and how fantastic the coverage is!  After one full power first coat I thinned the second coat.  I then broke out the ASCP Old White and hit the drawer fronts only, I really over brushed the Old White as I wanted a textured look.  I'm really happy with the end result that resembles linen. 


At first I was like well its done....... then me and the sandpaper came out and hit all the edges on one drawer and I knew right away that distressing was the way to go.  I didn't do a really heavy distress on this, just super fine on all edges it really pulled the piece together.


From the beginning I really liked the handles on this piece and leaving them as is really helped unit the piece in the end with the stained top.  I don't know about you I can see this desk in a boys room, a change table or in a front entry with a cute stool.  


Sincerely,
Sasha